Building an AI-Driven Scientific Workflow & Chatbot
Introduction
Nodeology is a new AI workflow-building library designed to simplify the creation of robust state machine workflows through an intuitive, user-friendly interface. The framework empowers researchers—especially those without extensive programming backgrounds—to rapidly design and deploy complete AI workflows using just prompt templates and existing functions. In this post, we’ll introduce Nodeology by constructing a simple, interactive, AI-assisted particle trajectory simulation workflow. By the end, you’ll have a chatbot capable of:
- Requesting user input for physical parameters of a simulated particle.
- Calculating the particle’s trajectory under electric and magnetic fields.
- Visualizing the trajectory through a 3D plot.
- Analyzing particle motion using a Vision-Language Model (VLM).
- Determining whether to continue or conclude based on user feedback.
We’ll walk through each step clearly—from understanding Nodeology’s core concepts (State, Nodes, and Workflows) to integrating them into an interactive user interface.
Understanding Nodeology’s Core Concepts
State
State is a shared data “backpack” accessible to every step (or Node) within the workflow, which can both read from and update it. In our example, it keeps track of:
- Simulation parameters (e.g.,
mass,charge). - Intermediate outputs (such as the 3D plot).
- User inputs and conversation history.
Think of State as the single source of truth traveling with you throughout the workflow’s lifecycle.
Nodes
A Node is the fundamental building block within a workflow and comes in two types:
- Prompt-based Node: Utilizes an LLM/VLM with prompt templates, extracting necessary data from
State, invoking the model, and then updating or adding new data back into theState. - Function-based Node: A decorated Python function that handles traditional scientific computations or data processing tasks (e.g., numerical simulations, file I/O, plotting) and stores the results directly into the
State.
This combination of AI-driven logic and conventional Python functions is precisely how Nodeology seamlessly integrates AI with domain-specific expertise.
Workflow
A Workflow in Nodeology is essentially a directed graph composed of Nodes:
- Flow definition: Clearly define the progression, such as “After Node A completes, pass control to Node B.”
- Conditional branches: Allow decision-making like “If condition X is true, execute Node Y; otherwise, Node Z.”
- User interactions: Easily integrate points where the workflow awaits user input before proceeding.
All these tasks are efficiently managed by Nodeology’s Workflow class, significantly reducing common workflow management overhead like error handling, concurrency, and checkpointing.
Defining Our Simulation State
We’ll begin by specifying which data we expect to carry throughout the workflow. This includes physical parameters (e.g., mass, charge, initial_velocity, etc.), plus placeholders for the user’s analysis or plot results.
Click to expand the code
from typing import List, Dict
import numpy as np
from nodeology.state import State

class TrajectoryState(State):
    """
    State for our particle trajectory workflow.
    It holds everything from initial parameters,
    user confirmations, and final analysis.
    """
    mass: float                   # Particle mass (kg)
    charge: float                 # Particle charge (C)
    initial_velocity: np.ndarray  # [vx, vy, vz]
    E_field: np.ndarray           # [Ex, Ey, Ez]
    B_field: np.ndarray           # [Bx, By, Bz]

    # A boolean for user confirmation
    confirm_parameters: bool

    # For storing the raw JSON from an LLM-based node
    parameters_updater_output: str

    # The computed 3D positions of the particle
    positions: List[np.ndarray]

    # We'll store a path or figure for the plotted trajectory
    trajectory_plot: str
    trajectory_plot_path: str

    # Where the LLM’s analysis result will land
    analysis_result: Dict

    # A boolean for continuing or finishing
    continue_simulation: bool
Key Takeaway: If you want a new value to persist or be shared across nodes, define it here.
Writing Our Nodes
Displaying Parameters
We’ll start small: a Node that shows the current simulation parameters to the user.
We’ll decorate a simple Python function with @as_node(...). This way, Nodeology recognizes it as a building block in the workflow.
Click to expand the code
import chainlit as cl
from chainlit import Message, run_sync
from nodeology.node import as_node

@as_node(sink=[])
def display_parameters(
    mass: float,
    charge: float,
    initial_velocity: np.ndarray,
    E_field: np.ndarray,
    B_field: np.ndarray,
):
    """
    Display the current simulation parameters using
    Chainlit's custom UI element.
    """
    parameters = {
        "Mass (kg)": mass,
        "Charge (C)": charge,
        "Initial Velocity (m/s)": initial_velocity.tolist(),
        "Electric Field (N/C)": E_field.tolist(),
        "Magnetic Field (T)": B_field.tolist(),
    }

    run_sync(
        Message(
            content="Below are the current simulation parameters:",
            elements=[
                cl.CustomElement(
                    name="DataDisplay",
                    props={
                        "data": parameters,
                        "title": "Particle Parameters",
                        "badge": "Configured",
                    },
                )
            ],
        ).send()
    )
    # No return value needed, so sink=[] above
When the workflow runs, it calls this function, pulls the relevant fields from the State, then sends a UI message with the data.
Confirming Parameters
We want an interactive step where the user can say “Yes, I’m okay with these parameters” or “No, let me adjust.” This is also done with a function-based Node:
Click to expand the code
from chainlit import AskActionMessage

@as_node(sink="confirm_parameters")
def ask_confirm_parameters():
    """
    Prompt user with 2 actions: 'Yes' or 'No'.
    Return True if 'Yes', False otherwise.
    """
    res = run_sync(
        AskActionMessage(
            content="Are you happy with the parameters?",
            actions=[
                cl.Action(name="yes", payload={"value": "yes"}, label="Yes"),
                cl.Action(name="no",  payload={"value": "no"},  label="No"),
            ],
        ).send()
    )
    # We store the boolean in 'confirm_parameters' in the State
    if res and res["payload"]["value"] == "yes":
        return True
    else:
        return False
Gathering User Edits
If the user chooses “No,” we want to ask for new parameters:
Click to expand the code
from chainlit import AskUserMessage

@as_node(sink=["human_input"])
def ask_parameters_input():
    """
    Wait for a text message from the user specifying
    how they want to update the parameters.
    """
    user_msg = run_sync(
        AskUserMessage(
            content="Please let me know how you want to change any of the parameters :)",
        ).send()
    )
    return user_msg["output"]  # We'll store this in 'human_input'
Updating Parameters
Now we let the LLM parse the user’s text and produce new numeric values. A typical instruction might be "Change the magnetic field to 1e4 1e4 0". The LLM can create a JSON object with updated mass, charge, E_field, etc.
Click to expand the code
from nodeology.node import Node
import json
import numpy as np

parameters_updater = Node(
    node_type="parameters_updater",
    prompt_template="""Update the parameters based on the user's input.

Current parameters:
mass: {mass}
charge: {charge}
initial_velocity: {initial_velocity}
E_field: {E_field}
B_field: {B_field}

User input:
{human_input}

Please return the updated parameters in JSON format.
{
    "mass": float,
    "charge": float,
    "initial_velocity": list[float],
    "E_field": list[float],
    "B_field": list[float]
}
""",
    sink="parameters_updater_output",  # We'll store the LLM response here (raw text/JSON)
    sink_format="json",
)

# We'll need a post-processing function to interpret that JSON
def parameters_updater_transform(state, client, **kwargs):
    # Convert the LLM's output from text to Python objects
    params_dict = json.loads(state["parameters_updater_output"])
    state["mass"] = params_dict["mass"]
    state["charge"] = params_dict["charge"]
    state["initial_velocity"] = np.array(params_dict["initial_velocity"])
    state["E_field"] = np.array(params_dict["E_field"])
    state["B_field"] = np.array(params_dict["B_field"])
    return state

parameters_updater.post_process = parameters_updater_transform
Calculating the Trajectory
Next, a pure Python function that solves the equations of motion for a charged particle via the Lorentz force. This is the “traditional” science piece:
Click to expand the code
import tempfile
from scipy.integrate import solve_ivp
from typing import List

@as_node(sink=["positions"])
def calculate_trajectory(
    mass: float,
    charge: float,
    initial_velocity: np.ndarray,
    E_field: np.ndarray,
    B_field: np.ndarray,
) -> List[np.ndarray]:
    """
    Numerically integrate the trajectory of a particle under
    electric & magnetic fields, returning the positions over time.
    """
    # Estimate cyclotron period if B is non-zero:
    B_magnitude = np.linalg.norm(B_field)
    if B_magnitude == 0 or charge == 0:
        cyclotron_period = 1e-6
    else:
        cyclotron_frequency = abs(charge) * B_magnitude / mass
        cyclotron_period    = 2 * np.pi / cyclotron_frequency

    # We'll simulate 5 cycles, each with 100 steps
    num_periods = 5
    num_points_per_period = 100
    total_time = num_periods * cyclotron_period
    total_points = num_periods * num_points_per_period

    time_points = np.linspace(0, total_time, total_points)

    def lorentz_force(t, state):
        vel = state[3:]
        force = charge * (E_field + np.cross(vel, B_field))
        acc = force / mass
        return np.concatenate([vel, acc])

    initial_position = np.array([0.0, 0.0, 0.0])
    initial_state = np.concatenate([initial_position, initial_velocity])

    sol = solve_ivp(
        lorentz_force,
        (time_points[0], time_points[-1]),
        initial_state,
        t_eval=time_points,
        method="RK45",
        rtol=1e-8,
    )

    if not sol.success:
        # Return zeros if something fails
        return [np.zeros(3) for _ in range(len(time_points))]

    return [sol.y[:3, i] for i in range(len(time_points))]
Plotting the Trajectory
We can create a plot (e.g., Plotly 3D scatter) and display it through Chainlit:
Click to expand the code
import plotly.graph_objects as go

@as_node(sink=["trajectory_plot", "trajectory_plot_path"])
def plot_trajectory(positions: List[np.ndarray]) -> str:
    """
    Generate a 3D plot of the positions and
    save it to a temporary file.
    """
    arr = np.array(positions)
    fig = go.Figure(
        data=[
            go.Scatter3d(
                x=arr[:, 0],
                y=arr[:, 1],
                z=arr[:, 2],
                mode="lines",
                line=dict(width=4, color="green"),
            )
        ]
    )
    fig.update_layout(
        scene=dict(xaxis_title="X (m)", yaxis_title="Y (m)", zaxis_title="Z (m)")
    )

    image_path = tempfile.mktemp(suffix=".png")
    fig.write_image(image_path)

    # Display in UI
    run_sync(
        Message(
            content="Below is the trajectory plot:",
            elements=[cl.Plotly(figure=fig)],
        ).send()
    )

    # Return figure + path
    return fig, image_path
Analyzing the Trajectory
Finally, a Node where the LLM interprets the motion qualitatively:
Click to expand the code
trajectory_analyzer = Node(
    node_type="trajectory_analyzer",
    prompt_template="""Analyze this particle trajectory plot.

Please determine:
1. The type of motion (linear, circular, helical, or chaotic)
2. Key physical features (radius, period, pitch angle if applicable)
3. Explanation of the motion
4. Anomalies in the motion

Output in JSON format:
{
  "trajectory_type": "type_name",
  "key_features": {
     "feature1": value,
     "feature2": value
  },
  "explanation": "detailed explanation",
  "anomalies": "anomaly description"
}""",
    sink="analysis_result",
    sink_format="json",
    image_keys=["trajectory_plot_path"],  # for image-based context, if the LLM can handle it
)

def display_trajectory_analyzer_result(state, client, **kwargs):
    """
    A post-process function that picks up the LLM's
    output, converts it to a dict, and displays it nicely.
    """
    import json
    state["analysis_result"] = json.loads(state["analysis_result"])
    run_sync(
        Message(
            content="Here is the trajectory analysis:",
            elements=[
                cl.CustomElement(
                    name="DataDisplay",
                    props={
                        "data": state["analysis_result"],
                        "title": "Trajectory Analysis",
                        "badge": state["analysis_result"].get("trajectory_type", "Unknown"),
                    },
                )
            ],
        ).send()
    )
    return state

trajectory_analyzer.post_process = display_trajectory_analyzer_result
Asking for More Simulation or Finish
We’ll close the loop by letting the user decide if they want to run more cycles:
Click to expand the code
@as_node(sink="continue_simulation")
def ask_continue_simulation():
    res = run_sync(
        AskActionMessage(
            content="Would you like to continue the simulation?",
            actions=[
                cl.Action(name="continue", payload={"value": "continue"}, label="Continue Simulation"),
                cl.Action(name="finish",   payload={"value": "finish"},   label="Finish"),
            ],
        ).send()
    )
    return (res and res["payload"]["value"] == "continue")
Orchestrating Everything in a Workflow
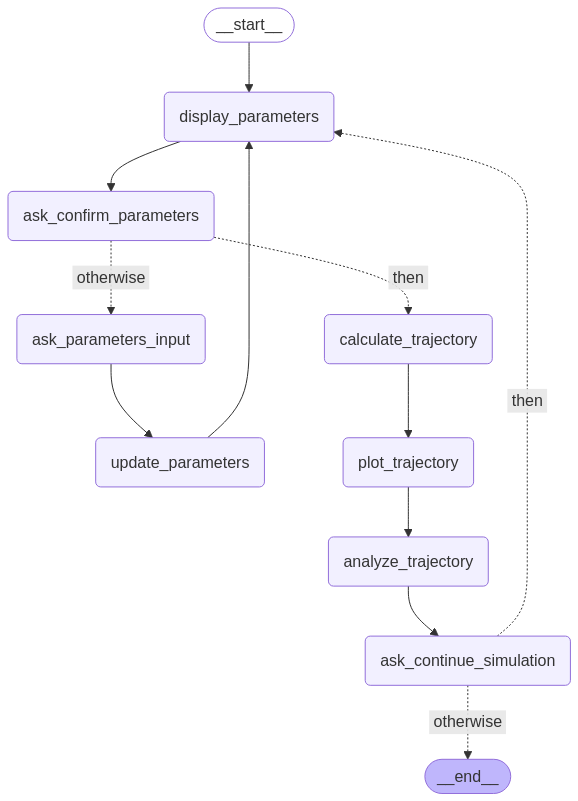
Now we piece all Nodes together in a Workflow. Let’s define it:
from langgraph.graph import END
from nodeology.workflow import Workflow

class TrajectoryWorkflow(Workflow):
    def create_workflow(self):
        # 1) Register our Nodes
        self.add_node("display_parameters", display_parameters)
        self.add_node("ask_confirm_parameters", ask_confirm_parameters)
        self.add_node("ask_parameters_input", ask_parameters_input)
        self.add_node("update_parameters", parameters_updater)
        self.add_node("calculate_trajectory", calculate_trajectory)
        self.add_node("plot_trajectory", plot_trajectory)
        self.add_node("analyze_trajectory", trajectory_analyzer)
        self.add_node("ask_continue_simulation", ask_continue_simulation)

        # 2) Define the flow (edges)
        self.add_flow("display_parameters", "ask_confirm_parameters")
        self.add_conditional_flow(
            "ask_confirm_parameters",
            "confirm_parameters",       # If user is happy
            then="calculate_trajectory",
            otherwise="ask_parameters_input",  # If not
        )
        self.add_flow("ask_parameters_input", "update_parameters")
        self.add_flow("update_parameters", "display_parameters")
        self.add_flow("calculate_trajectory", "plot_trajectory")
        self.add_flow("plot_trajectory", "analyze_trajectory")
        self.add_flow("analyze_trajectory", "ask_continue_simulation")
        self.add_conditional_flow(
            "ask_continue_simulation",
            "continue_simulation",  # If user wants to keep going
            then="display_parameters",
            otherwise=END,         # If user says “finish”
        )

        # 3) Set the first Node to run
        self.set_entry("display_parameters")

        # 4) Compile
self.compile()Note: Once compiled, Nodeology internally organizes everything as a state machine with branching logic, enabling flexible re-runs and so on.
Launching the Interactive Chat
At last, we bring it all together. We instantiate our workflow with an initial set of parameters and run it in UI mode:
Click to expand the code
# 1) Create the workflow
workflow = TrajectoryWorkflow(
    state_defs=TrajectoryState,       # Our custom state
    llm_name="gemini/gemini-2.0-flash",
    vlm_name="gemini/gemini-2.0-flash",
    debug_mode=False
)

# 2) Provide initial data
initial_state = {
    "mass": 9.1093837015e-31,  # electron mass
    "charge": -1.602176634e-19,
    "initial_velocity": np.array([1e6, 1e6, 1e6]),
    "E_field": np.array([5e6, 1e6, 5e6]),
    "B_field": np.array([0.0, 0.0, 50000.0]),
}

# 3) Run with a user interface
result = workflow.run(init_values=initial_state, ui=True)
When you run this file, a Chainlit web server will pop up in your console logs, typically at http://localhost:8000. Open that address in your browser and you now have a complete, AI-driven pipeline that merges human interaction, classical simulation, and LLM-based analysis. The user sees a straightforward chat interface, while under the hood, Nodeology coordinates each Node in a robust workflow. Below is a short video showing the workflow in action:
Visualizing, Exporting and Sharing
You can visualize your workflow as a mermaid graph or export it as a .yaml file:
Click to expand the code
# Visualize workflow as a mermaid graph
workflow.graph.get_graph().draw_mermaid_png(
    output_file_path="particle_trajectory_analysis.png"
)
Click to expand the code
# Export workflow to YAML file for sharing
workflow.to_yaml("particle_trajectory_analysis.yaml")
Click to expand the YAML file
# Example of the exported YAML file
name: TrajectoryWorkflow_03_13_2025_20_06_45
state_defs:
- current_node_type: str
- previous_node_type: str
- human_input: str
- input: str
- output: str
- messages: List[dict]
- mass: float
- charge: float
- initial_velocity: ndarray
- E_field: ndarray
- B_field: ndarray
- confirm_parameters: bool
- parameters_updater_output: str
- positions: List[ndarray]
- trajectory_plot: str
- trajectory_plot_path: str
- analysis_result: dict
- continue_simulation: bool
nodes:
  display_parameters:
    type: display_parameters
    next: ask_confirm_parameters
  ask_confirm_parameters:
    type: ask_confirm_parameters
    sink: confirm_parameters
    next:
      condition: confirm_parameters
      then: calculate_trajectory
      otherwise: ask_parameters_input
  ask_parameters_input:
    type: ask_parameters_input
    sink: human_input
    next: update_parameters
  update_parameters:
    type: prompt
    template: 'Update the parameters based on the user''s input. Current parameters:
      mass: {mass} charge: {charge} initial_velocity: {initial_velocity} E_field:
      {E_field} B_field: {B_field} User input: {human_input} Please return the updated
      parameters in JSON format. {{ "mass": float, "charge": float, "initial_velocity":
      list[float], "E_field": list[float], "B_field": list[float] }}'
    sink: parameters_updater_output
    next: display_parameters
  calculate_trajectory:
    type: calculate_trajectory
    sink: positions
    next: plot_trajectory
  plot_trajectory:
    type: plot_trajectory
    sink: [trajectory_plot, trajectory_plot_path]
    next: analyze_trajectory
  analyze_trajectory:
    type: prompt
    template: 'Analyze this particle trajectory plot. Please determine: 1. The type
      of motion (linear, circular, helical, or chaotic) 2. Key physical features (radius,
      period, pitch angle if applicable) 3. Explanation of the motion 4. Anomalies
      in the motion Output in JSON format: {{ "trajectory_type": "type_name", "key_features":
      { "feature1": value, "feature2": value }, "explanation": "detailed explanation",
      "anomalies": "anomaly description" }}'
    sink: analysis_result
    image_keys: trajectory_plot_path
    next: ask_continue_simulation
  ask_continue_simulation:
    type: ask_continue_simulation
    sink: continue_simulation
    next:
      condition: continue_simulation
      then: display_parameters
      otherwise: END
entry_point: display_parameters
llm: gemini/gemini-2.0-flash
vlm: gemini/gemini-2.0-flash
exit_commands: [stop workflow, quit workflow, terminate workflow]Happy Building! 🏗️ Nodeology is constantly evolving, so keep an eye on updates 👀 😊
Reuse
Citation
@online{yin2025,
  author = {Yin, Xiangyu},
  title = {Building an {AI-Driven} {Scientific} {Workflow} \& {Chatbot}},
  date = {2025-03-13},
  url = {https://xiangyu-yin.com/content/post_nodeology_example.html},
  langid = {en}
}